| Info |
|---|
|
2018-12-26: A patch version 1.1.2 is released to use the 4Q2018 (2018-12-21) release of CDISC Controlled Terminology. 2015-04-01: A patch version 1.1.1 is released to use the 1Q2015 (2015-03-27) release of CDISC Controlled Terminology. 2015-03-25: New version 1.1 is released to include CDISC COA Controlled Terminology, along with a couple of bug fixes. |
Purpose
This page purpose's is to introduce an Excel macro called "Quik2Code" with instructions to install and to provide use cases with examples.
...
The following describes the steps to install Quik2Code on a Microsoft Windows PC:
| Steps | Visual Aid (Click image to enlarge) |
|---|
A. Create folder and place Quik2Code Excel macro file - Using File Explorer, on the C: drive, create a CDISC folder, i.e., C:\CDISC
- Place the Excel macro file quik2code.xlsm in it
|
|
|
B. Add CDISC folder as a trusted folder for launching Excel macro - Open Excel
- Select File | Options. The Excel Options dialog box appears
- Select Trust Center on the left pane
- Click Trust Center Settings... The Trust Center dialog box appears
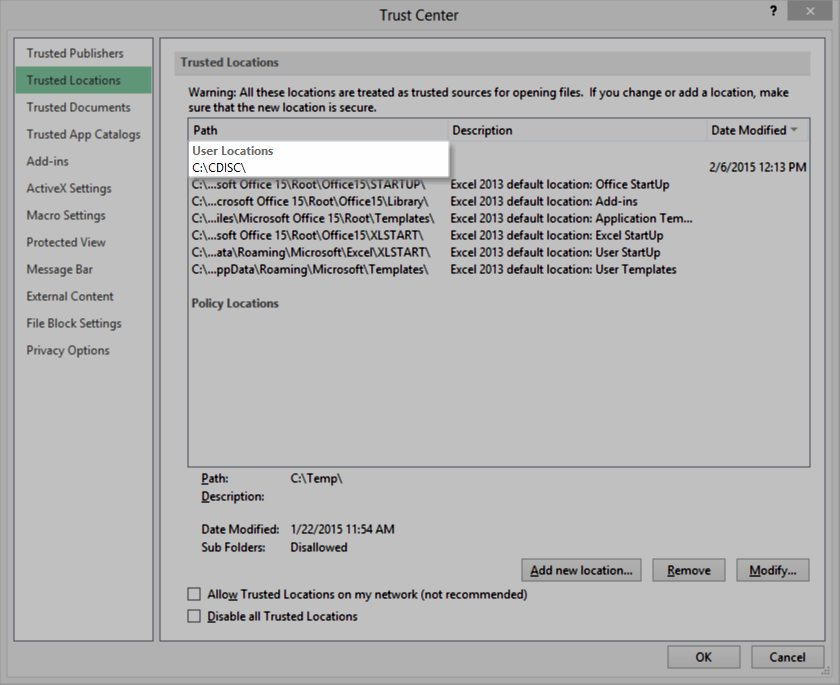
- Select Trusted Locations on the left pane
- Click Add new location... The Microsoft Office Trusted Location dialog box appears
- Type or browser to C:\CDISC as Path
- Click OK:
- The Microsoft Office Trusted Location dialog box closes
- C:\CDISC appears on the list of paths under Trusted Locations
- Click OK to close the Trust Center dialog box
| |
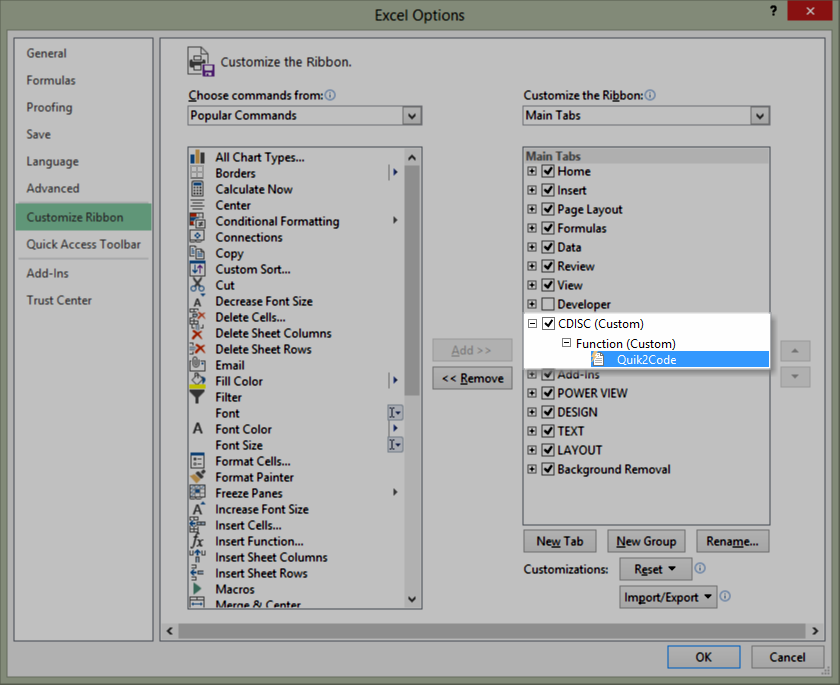
C. Create a customize Excel ribbon for Quik2Code (assuming Excel 2010 and 2013 versions) - Download this Excel UI customization file and place it into C:\CDISC folder
- Repeat Steps B1, B2 to bring back the Excel Options dialog box, if it is not already showing
- Select Customize Ribbon
- Click Import/Export at the lower right corner of the Excel Options dialog box
- Select the Import customization file option. The File Open dialog box appears
- Browse to the Excel UI customization file saved in Step C1
- Click Yes when prompted to replace ribbon
- An entry labeled CDISC (Custom) appears on the right side of the Excel Options dialog box
- Expanding the node will reveal Function (Custom)
- Expanding again will reveal Quik2Code
- Click OK to close the Excel Options dialog box
|  Image Modified Image Modified |
D.Verify Quik2Code Install - Select the ribbon labelled "CDISC" from the top menu
- Click the Quik2Code icon
- The CDISC Controlled Codelist spreadsheet appears and may obstruct Quik2Code. If so, minimize the CDISC Controlled Codelist spreadsheet
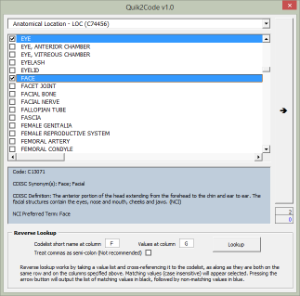
- The Quik2Code's user interface appears
|  Image Modified Image Modified
 Image Modified Image Modified
|
Use Case 1 - Direct Selection
Story: As a metadata developer, you want to pick out the commonly used codelist values from a codelist to constrain a research concept. The output will be a list of values with NCI EVS c-code, separated by semi-colon. To accomplish this using Quik2Code:
| Steps | Visual Aid (Click image to enlarge) |
|---|
| A. Launch Quik2Code from the CDISC ribbon |
|
|
B. Select a codelist from the top down down box - Click the drop down box to show a list of available codelist. A list of values for the selected codelist
|
appears- appear.
- Alternatively, enter a known codelist name into text area of the drop down box. Quik2Code will display a match, if available.
| Note |
|---|
The codelists are listed using this nomenclature: <<CDISC Codelist Name>> - <<CDISC Submission Value>> for the codelist, followed by the <<Codelist Code>> in parenthesis |
|
, | For example: Age Unit - AGEU (C66781)  Image Modified Image Modified
|
C. Check all the codelist values that apply |
- Click on a codelist value to select. A highlighted value will be included in the output.
- Click on a highlight to-deselect.
| Note |
|---|
- Selecting a codelist value will display its details in the light grey shaded area below.
- Some codelist values are long. Use the horizontal bar to scroll and view the entire text.
- Some codelists have many entries. Use the vertical bar to scroll and view the entire value set.
|
| For example, select 3 entries from the Age Unit codelist: DAYS, MONTHS, and YEARS  Image Modified Image Modified
|
D. Click the arrow button to the right will output a value list - Select a destination cell where an output shall appear
- Click the arrow button on the right. An output will appear in the destination cell.
| Note |
|---|
Semi-colon is used as delimiter to separate each value on the value list output. |
| For example, DAYS (C25301); MONTHS (C29846); YEARS (C29848) will display onto the |
active cell after selecting DAYS, MONTHS, and YEARSdestination cell  Image Modified Image Modified |
...
Use Case 2 - Reverse Lookup
Story 1: As a metadata developer, you want to re-conform an existing value list which may not be in the desirable format.
Story 2: As a metadata developer, you want to verify the validity of all codelist values on a value list. You also want to know the invalid values so that you can make corrective action.
| Steps | Visual Aid (Click image to enlarge) |
|---|
| A. Launch Quik2Code from the CDISC ribbon |
|
B. Configure the options in the Reverse Lookup section - For Codelist short name at column, enter the column (between "A" and "Z") where a codelist short name can be found. It will be used to cross-reference the value list.
- For Values at column, enter the column (between "A" and "Z") where a value list can be found. In other words, Values at columnx are members of the Codelist short name at column y.
- If any values may be delimited by commas, use the Treat commas as semi-colon option. Caution should be given when using this option, especially when many valid codelist values contain commas.
- Click Lookup:
- When a lookup is successful, the matching codelist will be displayed on the codelist drop down box.
- Each matching codelist value will appear selected.
- Non-matching codelist values will be cached for output (see Step C below)
|
| | |
| | |
- Notice the two counters below the arrow button:
- The upper counter shows # of matches.
- The lower counter shows # of mismatches for each reverse lookup.
|  Image Added Image Added
|
C. Click output and review - Select a destination cell where an output shall appear
- Click the arrow button to output
| Note |
|---|
- Matching is case-insensitive
- Matched values will appear in black.
- Non-matching values will appear after the matched ones, in blue without c-code
|
|  Image Added Image Added
Additional examples and outputs:  Image Added Image Added
|
|


